Why is this component called passive and what does this mean
Unlike the original mitemp_bt component (and most other solutions), this custom component does not use connections (polling) to collect data. The fact is that many sensors from the Xiaomi ecosystem transmit information themselves about their condition to the air with some frequency. We need only to “passively” receive these messages and update the status of the corresponding entities in the Home Assistant. What does this give us?
- firstly, it reduces the power consumption of the sensors (the battery lasts longer), since the sensor does not transmit anything other than that provided by its developers.
- secondly, since the range of bluetooth is rather limited, passive reception can solve some problems that arise when using “polling” components. In the case of connecting to a sensor, a two-way exchange takes place, which means we not only should “hear” the sensor well, but the sensor, in its turn, must also “hear” us well, and this could be problematic. To increase the radius of reception, you can, for example, install an external bt-dongle with a large antenna on your host, to make it “hear” better, but you can’t do anything with the sensor itself. A passive data collection method solves this problem, because in this case the sensor does not know about our existence, and should not “hear” us at all. The main thing is that we “hear” it well.
- another important point is the fact that the frequency of sending data for many sensors is quite high. For example, the LYWSDCGQ sensor sends about 20-25 measurements per minute. If your sensor is far away, or you have poor reception conditions, you only need to receive one out of twenty messages to update your Home Assistant entity… Not a bad chance, is it? And if you increase the
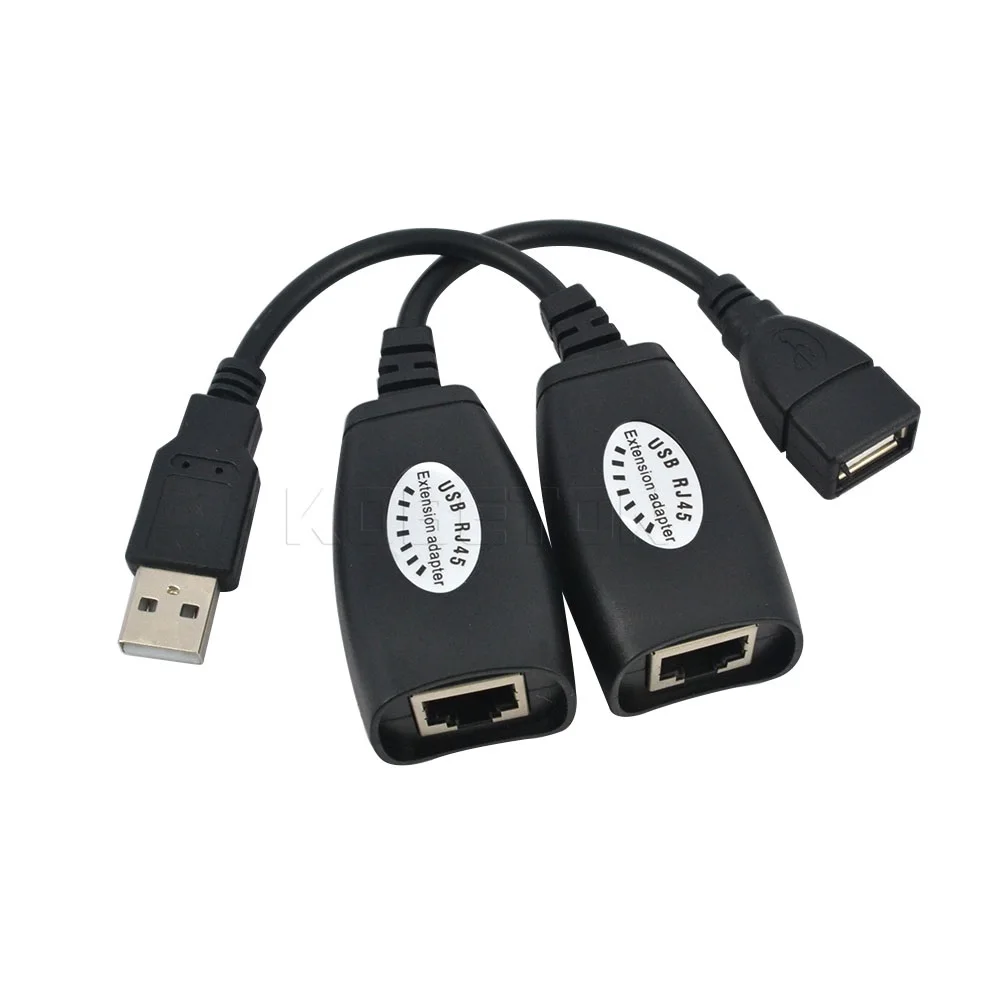
periodoption, then the chances increase even more. In addition, receiving a stream of 20-25 measurements per minute gives you the opportunity to increase the resolution of measurements by averaging (which is implemented in our component) and this gives more smooth (beautiful, if you want) graphs and a faster reaction of corresponding automations. - passive method allows without problems collecting data from several interfaces simultaneously, which expands your ability to increase the reception area. For example, you can use several external BT-dongles connected by cheap USB-RJ45 extenders and high-quality cat5/6 ethernet cables.
I’m not sure that I have listed all the advantages resulting from the passivity of this component. But I hope that I was able to explain the essence.
Installation Issues
I get a PermissionError in Home Assistant after the installation or python upgrade
Python needs root access to access the HCI interface. If Python doesn’t have root access, you will get an error message in Home Assistant which ends with:
PermissionError: [Errno 1] Operation not permitted
First, try to set root access with
sudo setcap 'cap_net_raw,cap_net_admin+eip' `readlink -f \`which python3\``
Next, check that it is set correctly with the following command
sudo getcap `readlink -f \`which python3\``
The command will return the path to python and looks like (can vary based on your python version):
/usr/bin/python3.8 = cap_net_admin,cap_net_raw+eip
Make sure you first stop Home Assistant and then start Home Assistant again. Restarting Home Assistant is not enough, as the python process does not exit upon restart.
If you have multiple python versions, make sure it refers to the same version which is used by Home Assistant. If Home Assistant is using a different version, e.g. python3.6, run the following command to set the correct version (adjust it to your own version if needed).
sudo setcap 'cap_net_raw,cap_net_admin+eip' /usr/bin/python3.6
How do I find the MAC address or the HCI number of the HCI interface?
It is advised to configure a MAC address for the HCI interface in stead of a HCI interface number, as it won’t change. The HCI interface number can change, e.g. when adding other USB devices. When using configuration in the UI, the available MAC addresses are given in the options menu of the integration. In case you are using configuration in YAML, you can find the MAC address in two ways, in the log of Home Assistant or with a shell command.
To get a log with the available MAC addresses, enable logger in Home Assistant by adding the following lines to configuration.yaml:
logger:
  default: warn
  logs:
    custom_components.ble_monitor: info
After a restart, you will find the MAC addresses in the Home Assistant log.
An alternative is to use the following shell command to find the correct MAC address or interface number number:
hcitool dev
The command will return the HCI MAC address and interface number.
Devices:
        hci0    B8:27:EB:77:75:50
I get AttributeError: module ‘socket’ has no attribute ‘AF_BLUETOOTH’ in Home Assistant after the installation or python upgrade
This means that Python is built/installed without support for Bluetooth. You will have to rebuild Python 3 with bluetooth.h. When using a virtual environment (venv), you can do this with the following instructions. Please make a backup first!!!, as you will have to delete the venv with Home Assistant and reinstall it in a new venv. You might need to modify commands for your own situation.
- Install BT library with:
sudo apt-get install bluetooth libbluetooth-dev
sudo pip3 install pybluez
- Rebuild Python:
cd Python-3.8.6/
./configure
make
sudo make install
- Disable systemctl and reboot:
sudo systemctl disable home-assistant@homeassistant
sudo reboot
- Removed old venv and save Home Assistant configuration:
cd /srv/homeassistant
sudo rm * -R
cd ..
sudo chown homeassistant:homeassistant homeassistant
cd /home/homeassistant
sudo mv .homeassistant/ .homeassistant_backup
sudo su -s /bin/bash homeassistant
- Create a new venv and install HomeAssistant again:
cd /srv/homeassistant
python3.8 -m venv .
source bin/activate
pip3 install homeassistant
hass -v
- When you see
INFO (MainThread) [homeassistant.core] Starting Home Assistantin log use CTRL+C to break and restore your Home Assistant configuration:
deactivate
exit
cd /home/homeassistant
sudo rm .homeassistant/ -R
sudo mv .homeassistant_backup/ .homeassistant
sudo chmod -R 0777 /home/homeassistant/
sudo systemctl enable home-assistant@homeassistant
sudo reboot
- Wait a long time before all plugins are installed in Home Assistant
How can I create a battery sensor?
You can set option batt_entities to True - the battery sensor entity will be created automatically for each device reporting battery status.
Or you can create a battery sensor by using a template sensor. Add the following to your configuration.yaml. Make sure you adjust the name of the sensor with your own sensor.
sensor:
  - platform: template
    sensors:
      ble_battery_582d34339449:
        friendly_name: "Battery"
        unit_of_measurement: "%"
        value_template: "{{ state_attr('sensor.ble_temperature_582d34339449', 'battery_level') }}"
        device_class: "battery"
Reception Issues
My sensor doesn’t receive any readings from my sensors anymore or only occasionally
The custom component uses Bluetooth (BLE) to receive messages from your sensor(s). The number of messages per minute that are being send by your sensor depends on the type, but is around 20 messages per minute for LYWSDCGQ, LYWSD02 and CGG1 sensors, around 2 per minute for HHCCPOT002 and around 1 per minute for HHCCJCY01T.
The number of messages that are received by Home Assistant can be less or even zero. Parameters that affect the reception of messages are:
- The distance between the sensor and the Bluetooth device on your Home Assistant device.
Try to keep the distance as limited as possible.
- Interference with other electrical devices.
Especially SSD devices are known to affect the Bluetooth reception, try to place your SSD drive as far as possible from your Bluetooth tranceiver.
-
Metal cases are a big problem for built-in bluetooth and wifi without an external antenna!
-
The quality of your Bluetooth transceiver.
The range of the built-in Bluetooth tranceiver of a Raspberry Pi is known to be limited. Try using an external Bluetooth transceiver to increase the range, e.g. with an external antenna. It is also worth noting that starting from v0.5.5, a component can receive data from multiple interfaces simultaneously (see the hci_interface option).
- You should also pay attention to this issue, since your problem may not be directly related to reception.
How to increase coverage
There are several ways to increase coverage:
- use an external BT-dongle (preferably with a full-size antenna).
- use multiple spaced BT-dongles. You can experiment with various extension cords (for example, inexpensive USB-RJ45 extenders in combination with a regular ethernet cable).
- use additional devices with their own BT-interface, and connect them to Home Assistant. For example, it could be another raspberrypi with Home Assistant and our component, connected to the main host using the remote_homeassistant component, which links multiple Home Assistant instances together.
My sensor’s BLE advertisements are encrypted, how can I get the key?
There are two types of encryption, Yeelight Remotes (YLYK01YL) and dimmers (YLKG07YL and YLKG08YL) use a legacy MiBeacon (V2/V3) encryption, all other devices (with encryption) use the later MiBeacon V4/V5 encryption.
How to get the MiBeacon V4/V5 encryption key
The BLE advertisements from some devices are encrypted. To decrypt these messages, you need to configure the encryption key. This encryption key is a 16 bytes (32 characters) long string. The encryption key (also called bind key or beaconkey) is broadcasted at the moment it is created, e.g. when adding the sensor to the MiHome app, but it is also stored in the Xiaomi cloud. This means that there are several ways to get the encryption key. The first 2 options are the easiest:
1. Xiaomi Cloud Tokens Extractor
Get the encryption key with a python script called Xiaomi Cloud Token Extractor. The script logs in on the Xiaomi Cloud (password of your Xiaomi account is required) and extracts information. You will get a list of all devices that are added to the MiHome app. Look for your sensor in the list and copy the BLE KEY. If the key ends with FFFFFFFF, the sensor does not require an encryption key. This method works on Windows (use the exe file) as well as Linux (or any platform that runs python).
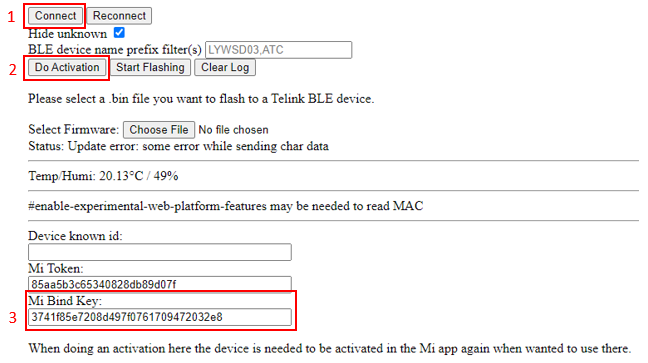
2. TelinkFlasher (WebBluetooth)
Get the encryption key with the online tool on the TelinkFlasher website. This lets you activate devices without ever touching Xiaomi servers.
Note that even though most functionality there (flashing) is only for LYWSD03MMC sensors, this particular version of the page has been modified to allow activation of any device.
- Keep the sensor close to the mobile phone (use Chromium-based browsers on Android, try WebBLE (paid app) on iOS) or use a PC.
- Make sure that the bluetooth is enabled.
- Using your browser, navigate to this page.
- If using Linux: Ensure you enabled “experimental web platform features”. Therefore copy the according link (i.e. chrome://flags/#enable-experimental-web-platform-features for Chrome), open a new browser tab, paste the copied URL. Now set the Experimental Web Platform features flag to Enabled and restart the browser.
- Now, click the [Connect] button (1) and wait until it shows “Connected.” See the Log section at the bottom. Choose the according target device (i.e. LYWSD03MMC) to pair.
- Once connected, click the [Do Activation] button (2) and wait until the “Mi Bind Key” (3) shows the information.
Note that this last step will generate a new encryption key, which means it won’t be connected to the MiHome app anymore.
3. MiHome mod (Android only)
Get the key with the customized MiHome mod with the following steps.
- You will first have to allow apps to be installed from “unknown sources” in your android settings (Settings – security – select “unknow sources).
- Create a folder
/devicestorage/vevs/logs/, wheredevicestorageis the internal storage of your phone. It’s important to do this before installing the app. - Download the latest version of MiHome mod and install the MiHome mod apk on your android phone. Use google translate to translate the website, as the website is only available in Russian. At the bottom, you will find the download link to the latest version. MiHome mod is basically just MiHome with some translatons from chinese to English and Russian, but also with the possibility to save the encryption key.
- During setup of the app, give access to the local device storage.
- Add the sensor device to the MiHome app.
- After setting up, a file
pairings.txtwill be created in/devicestorage/vevs/logs/misc/pairings.txt. Open this file. The encryption key you need is calledBindkey. Also make a note of the corresponding Mac. If thepairings.txtfile isn’t created, try an older version of MiHome mod.
4. Intercepting the MiHome application traffic
Get the key from the MiHome application traffic (in violation of the Xiaomi user agreement terms).
Unfortunately, Xiaomi has enabled additional encryption of API requests recently, and therefore the procedure for intercepting traffic has become much more complicated. Most of the instructions below won’t work anymore, as they are written at the time before encryption was enabled, but we are currently (successfully) looking into the Charles proxy method to deal with this encryption. If you are successfull with this or one of the other methods, please open an issue and share the steps you took with us.
- iOS:
- using Charles proxy, paid $7-10. For more detailed instructions, check these instructions.
- using Stream - Network Debug Tool, free. For more detailed instructions, check these instructions or these instructions.
- Android:
- using Packet Capture.
- using Burp Suite, device must be rooted.
How to get the MiBeacon V2/V3 encryption key
Yeelight Remote (YLYK01YL) and dimmers (YLKG07YL and YLKG08YL) use a legacy type of encryption. This MiBeacon V2/V3 encryption key is shorter than the MiBeacon V4/V5 encryption key, as it is a 12 bytes (24 characters) long string. You won’t be able to retrieve the encryption key with method 1 and 2 from above. There are different ways to get the key, the easiest is to use a python script to get the key (method 5). If your remote is connected to a ceiling light/fan, an alternative is to follow method 6 (miiocli tool). A third alternative is method 7, which also works when you don’t have a ceiling light/fan connected (which is more or less similar to method 3 from above).
5. get_beacon_key python script
We have created a python script that will get the beaconkey by connecting to the remote/dimmer, which can be found here. The script is based on a script that is used for Mi Kettles. You can get the beaconkey with the following commands.
wget https://raw.githubusercontent.com/custom-components/ble_monitor/master/custom_components/ble_monitor/ble_parser/get_beacon_key.py
pip3 install bluepy
python3 get_beacon_key.py <MAC> <PRODUCT_ID>
Replace <MAC> with your MAC address of the remote/dimmer and replace <PRODUCT_ID> with one of the following numbers, corresponding to your remote/dimmer.
| PRODUCT_ID | Device | Type |
|---|---|---|
| 339 | ‘YLYK01YL’ | Remote |
| 950 | ‘YLKG07YL/YLKG08YL’ | Dimmer |
| 959 | ‘YLYB01YL-BHFRC’ | Bathroom Heater Remote |
| 1254 | ‘YLYK01YL-VENFAN’ | Fan Remote |
| 1678 | ‘YLYK01YL-FANCL’ | Ventilator Fan Remote |
Example:
python3 get_beacon_key.py AB:CD:EF:12:34:56 950
This will return the beaconkey from your device.
6. miiocli tool
You can get the encryption key with the miiocli tool (python-miio).
- First get the IP address and TOKEN of your the device the remote/dimmer is connected to with Xiaomi cloud token extractor. Login with your Xiaomi credentials and make a note of the
<IP>and<TOKEN>of the device the remote/dimmer is connected to, e.g. a Yeelight ceiling light. - Install
python-miio, installation instructions can be found in the documentation. - Send the following command, while replacing
<IP>and<TOKEN>with the result of the first step.
miiocli device --ip <IP> --token <TOKEN> raw_command ble_dbg_tbl_dump '{"table":"evtRuleTbl"}'
This will return something like:
Running command raw_command
[{'mac': '3b48c54324e4', 'evtid': 4097, 'pid': 950, 'beaconkey': 'c451234558487ca39a5b5ab8'}, {'mac': '1230e94124e3', 'evtid': 4097, 'pid': 339, 'beaconkey': '341342546305f34c2cea3fde'}]
Make a note of the mac and beaconkey. The beaconkey is the encryption key you will need. 'pid' corresponds to the PRODUCT_ID as mentioned in method 5. The mac is reversed per two, so in the example above, the MAC of the remote is E4:24:43:C5:48:3B.
7. MiHome mod (Android only)
If you don’t have a device (ceiling light) to pair your remote/dimmer with, you can get the key with the customized MiHome mod with the following steps.
- You will first have to allow apps to be installed from “unknown sources” in your android settings (Settings – security – select “unknow sources).
- Create a folder
/devicestorage/vevs/logs/, wheredevicestorageis the internal storage of your phone. It’s important to do this before installing the app. - Download MiHome mod (Make sure your have the modified version 6.5.700_63911_vevs_dimmer.apk) and install the MiHome mod apk on your android phone. MiHome mod is basically just MiHome with some translatons from Chinese to English and Russian, but also with the possibility to save the encryption key and in this specific version the possibility to add the dimmer/remote.
- During setup of the app, give access to the local device storage.
- It’s suggested to choose India as the region, as this will allow you to use a temporary account and the beaconkey won’t change anymore.
- Put your device in pairing mode, click + and pair the remote to the MiHome app.
- After setting up, a file
pairings.txtwill be created in/devicestorage/vevs/logs/misc/pairings.txt. Open this file. The encryption key you need is calledBindkey. Also make a note of the corresponding Mac. If thepairings.txtfile isn’t created, try an older version of MiHome mod. - You can also read the key after the pairing with Xiaomi cloud token extractor. Use region
i2if you have selected India before.
Other Issues
How can I use my device as a tracker
This integration is also capable of tracking Bluetooth devices, as long as it is using a static MAC address (public or random static (lifetime) address). To track a device, add the mac address of the device to track under the devices option and enable the option track_device. The tracker will listen to every advertisement that is send by the device. As this can be quite often, an tracker_scan_interval can be set to reduce the number of state updates in Home Assistant (default 20 seconds). When no advertisments are received anymore, the device tracker entity state will turn to Away after the set consider_home interval (default 180 seconds).
How to remove devices and sensors
Removing devices can be done by removing the corresponding lines in your configuration.yaml. In the UI, you can delete devices by typing - in the MAC address field. Note that if the discovery option is set to True sensors will be discovered automatically again.
Unfortunately, old devices and entities are not entirely deleted by this, they will still be visible, but will be unavailable after a restart. The same applies for changing a name of an existing device in YAML, the entities with the old name will still remain visible, but with an unavailable state after a restart. To completely remove these left overs, follow the following steps.
1. Remove old entities
First, delete the old entities, by going to configuration, integrations and selecting devices in the BLE monitor tile. Select the device with old entities and select each unavailable entity, to delete it manually. If the delete button isn’t visible, you will have to restart Home Assistant to unload the entities. Make sure all old entities are deleted before going to the next step.
2. Remove old devices
If the device doesn’t have any entities anymore, you can delete the device as well. Unfortunately, Home Assistant doesn’t have an delete option to remove the old device. To overcome this problem, we have created a service to help you solve this. Go to developer tools, services and select the ble_monitor.cleanup_entries service. Click on Call service and the device should be gone. If not, you probably haven’t deleted all entities (go to step 1).
Conflicts with other components using the same BT interface
Since our component uses a special operating mode of the HCI interface and works with a continuous data stream, conflicts with other software using the same HCI interface are possible. The conflict is caused by the fact that another component can switch the HCI interface to a different operating mode, thereby stopping the reception of data. Or our component may lead to malfunctioning of another component. A reliable, but not the only way out of this situation (apart from the refusal to use one component in favor of another) can be the use of two BT-interfaces (one for our component, the second, for example, for the tracker). Work is underway to find other solutions to such situations…
My sensor stops receiving updates some time after the system restart
Often, the cause of this is the presence of bugs in the system components responsible for the BT operation (kernel modules, firmwares, etc). As a rule, in such cases, the corresponding entries appear in the system log. Please carefully review the contents of your syslog, and try searching the Internet for a solution - with high probability you are not alone in this. For example, here is an issue with a typical Raspberry PI problem - BT problem, Raspberry PI3 and Hass.io
In addition, in the case of Raspberry Pi, a common problem is a lack of power. If you do not observe any negative effects associated with a lack of power, then this does not mean that they actually are not present. We have feedback from users who have solved their bluetooth problems installing a more powerful power supply and high-quality cable. Good powering is very important for raspberry. In addition to a sufficiently powerful power supply, attention should be paid to the power cable - it should be able to deliver this power. Often, to compensate for losses, power supplies are made with a slightly higher output voltage (up to 5.1V or even 5.25V).
My sensor from the Xiaomi ecosystem is not in the list of supported ones. How to request implementation?
- Install the component if you have not already done so.
- Make sure you have logger enabled, and logging enabled for
infolevel (globally or just forcustom_components.ble_monitor). For example:
logger:
  default: warn
  logs:
    custom_components.ble_monitor: info
- Place your sensor extremely close to the HA host (BT interface).
- Enable the option
report_unknownby specifying the sensor type you want to get info from. - Wait until a number of “BLE ADV from UNKNOWN” messages accumulate in the log.
- Create a new issue, write everything you know about your sensor and attach the obtained log.
- Do not forget to disable the
report_unknownoption (delete it or set it toFalseand restart HA)! Since the potentially large output of this option will spam the log and can mask really important messages. - Wait for a response from the developers.
The BLE advertisements, which are collected with the above procedure, can also be collected with hcidump with the following command (leave it running for a couple of minutes). If you are using a full Home Assistant installation including Home Assistant OS, etc, you will have to follow this procedure first to get access to these commands.
sudo hcidump --raw hci > dump.txt
In case you get Disable scan failed: Input/output error, reset hciconfig with one of the following
sudo hciconfig hci0 down
sudo hciconfig hci0 up
or
sudo hciconfig hci0 reset
And than run the first command again.
Attach the created dump.txt to a new issue as described above.
If you don’t have access to hcidump, you could also use the android app Bluetooth LE Scanner to collect data.
My sensor isn’t showing the battery level
Battery level is not broadcasted by all sensors. Check the list of supported sensors to see if your sensor supports battery level. LYWSD02 sensors need to be updated to firmware 1.1.2_00085 or above to the show battery level.
Tips and Tricks
How to know exactly if the reception of data from my sensors has stopped?
When the reception of data from sensors is stopped for some reason (hardware failure, errors at the system level, and so on), it may take an unacceptably long time before we notice this fact. Here is a discussion of a solution to solve this problem using a template binary sensor, which can be used in automation to send notifications, for example.
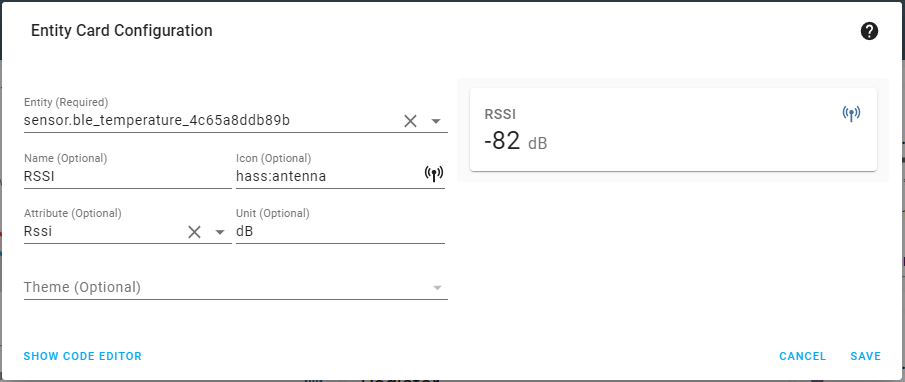
How can I add a sensor in lovelace that shows the RSSI signal strength?
There are several ways to do this. If you want to show it in an entity card, you can add it in lovelace directly. Select Rssi as the attribute to display.
If you want to use the entities card (with multple sensors), just add a sensor entity from which you want to display the RSSI to the entities card and click on the pencil. First change the icon and name and click on view code editor at the bottom (note that there are two view code editor buttons, use the one at the bottom). Change the code to the following format.
type: entities
entities:
  - entity: sensor.ble_temperature_livingroom
    type: attribute
    attribute: rssi
    icon: 'hass:antenna'
    name: RSSI
    suffix: dB
A third option is more advanced and will create a new sensor based on a template sensor. If you e.g. want to use graphs, you will need to create a template sensor. Add the following to your YAML configuration and modify livingroom to represent your own sensor.
sensor:
  - platform: template
    sensors:
      ble_rssi_livingroom:
        friendly_name: "RSSI BLE sensor Livingroom"
        device_class: signal_strength
        unit_of_measurement: dB
        value_template: >-
          {% set sensors = [state_attr('sensor.ble_temperature_livingroom','rssi')|float, state_attr('sensor.ble_humidity_livingroom','rssi')|float, state_attr('sensor.ble_battery_livingroom','rssi')|float] %}
          {% if sensors | sum == 0 %}
            -99
          {% else %}
            {{ ((sensors | sum) / (sensors | select('lt',0) | list | length)) | round | int }}
          {% endif %}
After a restart, a new sensor sensor.ble_rssi_livingroom will be created, which you can use where you want.
Debug
To enable debug logging, add the following lines to configuration.yaml:
logger:
  default: warn
  logs:
    custom_components.ble_monitor: debug
In addition, the btmon utility can provide a lot of useful information. For example, using the command.
btmon --write hcitrace.snoop | tee hcitrace.txt
You can write to the hcitrace.snoop and hcitrace.txt files the moment the problem occurs and attach this files to your issue.
Forum
You can more freely discuss the operation of the component, ask for support, leave feedback and share your experience in our topic on the Home Assistant forum.